
One of the biggest frustrations of owning an entry-level or mid-range home embroidery machine—such as the Brother SE600, SE700, PE535, PE800, PE900, or Janome Memory Craft—is hitting the physical hoop limit. You find the perfect sweatshirt chest lettering or jacket back design, only to realize the pattern measures 180 mm wide while your hoop is strictly limited to 4×4″ (100×100 mm) or 5×7″ (130×180 mm).
Can you shrink a large embroidery design down by 40% to force it into a 4×4″ hoop? Never. Shrinking an existing stitch file by more than 10% without recalculating stitch density crushes needle penetrations together, causing immediate bird-nesting, shredded thread, and broken needles.
Instead, professional embroiderers use Multi-Hoop Splitting—dividing a large design into Part 1 and Part 2 and stitching them in two sequential hoopings. Here is how to split your design safely using the free Stitch Realm Multi-Hoop Splitter.
Why Simple “Cutting” Ruins Embroidery Designs
If you slice an embroidery file in half without specialized engineering safeguards, two major problems occur on the machine:
- Unraveling Seam Threads: Wherever a stitch segment is severed across the split line, the thread lacks a tie-off knot. After the first wash, the embroidery unravels down the center.
- Visible Gaps or Overlaps Between Hoopings: Re-hooping fabric by eye is nearly impossible. Even a 1.5 mm shift leaves an ugly gap down the middle of your garment.
How the Stitch Realm Smart Multi-Hoop Splitter Solves Both Problems
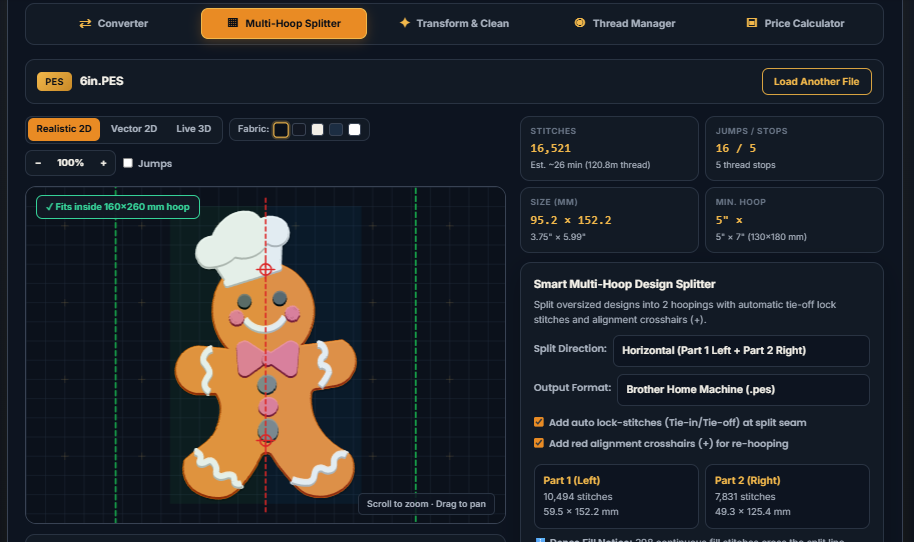
When you open the Multi-Hoop Splitter (▦) tab inside the Stitch Realm Studio, the engine applies three automated protections:
| Engineering Feature | What It Does Inside Your File | Why It Matters on Your Machine |
|---|---|---|
| 1. Natural Boundary Detection | Prioritizes splitting along existing jump stitches and color stops before cutting continuous fills | Minimizes visible seams across satin lettering and獨立 motifs |
| 2. Auto Tie-Off / Tie-In Lock Stitches | Injects micro lock-stitch knots (0.4 mm back-and-forth) whenever a stitch path crosses the split axis | Prevents cut threads from pulling out or unraveling in the wash |
| 3. Registration Crosshairs (+) | Adds two basting alignment crosses (+) along the split line at the end of Part 1 and start of Part 2 | Lets you lower your needle directly over the stitched crosshairs when hooping Part 2 for sub-millimeter alignment |
Step-by-Step Tutorial: Splitting & Stitching a Multi-Hoop Design
Step 1: Upload Your Design and Check Hoop Boundaries
- Go to the Stitch Realm Studio and drop your .PES, .DST, .JEF, or .EXP file into the studio.
- Click the Transform & Clean (✦) tab first and select your hoop size (4″ × 4″ Home Hoop (100 × 100 mm) or 5″ × 7″ Home Hoop (130 × 180 mm)).
- While in the Transform & Clean tab, click Clean Micro-Stitches (< 0.3 mm). Removing stacked microscopic needle penetrations before splitting prevents thread breaks along dense borders.
Step 2: Configure Your Split Axis in the Multi-Hoop Splitter Tab
- Click the Multi-Hoop Splitter (▦) tab in the top studio bar.
- Choose your Split Direction:
- Horizontal (Part 1 Left + Part 2 Right): Ideal for wide chest logos, names, and sweatshirt banners.
- Vertical (Part 1 Top + Part 2 Bottom): Ideal for tall floral borders, tote bags, and jacket backs.
- Keep both checkboxes enabled:
- ✓ Add auto lock-stitches (Tie-in/Tie-off) at split seam
- ✓ Add red alignment crosshairs (+) for re-hooping
- Inspect the live canvas preview: the red dashed line shows the exact split seam, and the two red ⊕ targets show where your alignment crosshairs will stitch.
- Click Download Both Split Parts (.ZIP) to get Design_Part1.pes and Design_Part2.pes.
Step 3: How to Align Part 1 and Part 2 on Your Embroidery Machine
- Stitch Part 1: Hoop your garment and stabilizer normally and stitch Part 1. The very last color stop of Part 1 will stitch two small alignment crosshairs (+) using contrasting thread (or water-soluble thread). Do not un-hoop until those two crosshairs are stitched.
- Re-Hoop for Part 2: Un-hoop the fabric, shift the hoop to the second half of the design area, and load Part 2 on your machine.
- Test Alignment with the Needle Drop Trick: The very first color stop of Part 2 is the exact same pair of alignment crosshairs (+). Advance your machine to the center of the first crosshair, turn the handwheel to lower the needle tip right above the fabric, and adjust your hoop position or machine X/Y offset until the needle drops dead-center into the crosshair stitched in Part 1.
- Snip & Finish: Once aligned, skip the crosshair color stop (or stitch over it to verify), stitch the rest of Part 2, and snip away the two temporary alignment marks!
Looking for Ready-to-Stitch Designs? Browse our collection of clean, machine-tested embroidery files on the Stitch Realm Shop—digitized with smooth underlay and zero stacked micro-stitches.