
How to Convert DST to PES (and EXP, JEF) Online for Free Without Losing Thread Colors
If you have ever downloaded a commercial .DST embroidery file and loaded it onto a Brother, Baby Lock, or Janome home embroidery machine—only to discover that your machine refuses to read the USB drive or displays bizarre neon greens and purples instead of the original colors—you are not alone.
Understanding how industrial stitch files differ from home embroidery formats is the key to clean stitch-outs. In this guide, you will learn the exact technical differences between .DST, .PES, .EXP, and .JEF, why color shifts happen during conversion, and how to convert and recolor your files 100% locally in your browser using the free Stitch Realm 5-in-1 Embroidery Studio.
Why Do DST Files Show the Wrong Thread Colors?
The Tajima .DST format is the universal workhorse of commercial multi-head embroidery machines. However, .DST was engineered in an era when industrial machine operators manually threaded needles on a 12-needle or 15-needle head using a printed paper production sheet.
Because of this design, a .DST binary file stores only needle X/Y movement coordinates, jump commands, trims, and STOP / color-change flags—it does not store RGB color values or thread catalog numbers in its 512-byte header.
When you open a .DST file on software or convert it to Brother .PES without assigning a palette, the software simply guesses a default sequence of placeholder colors.
Embroidery File Format Compatibility Reference Table
Before converting your design, check which native file format and hoop coordinate system your embroidery machine requires:
Embroidery Format | Primary Machine Brands | Stores RGB / Thread Catalog? | Binary Coordinate Structure | Best Use Case |
|---|---|---|---|---|
Tajima (.DST) | Tajima, Ricoma, Barudan, Bai, Happy, Commercial Multi-Needles | No (Stores STOP flags only) | 3-byte balanced-ternary stitch packets after a 512-byte ASCII header | Commercial production & universal digitizer exchange |
Brother (.PES / .PEC) | Brother (SE/PE/Luminaire/Persona), Baby Lock | Yes (64-color Brother PEC catalog + RGB in v6) | #PEC0001 header + compressed PEC graphic & stitch blocks | Home & prosumer single-needle and multi-needle machines |
Melco / Bernina (.EXP) | Bernina, Melco, Amaya | No (Uses separate sheet or palette) | 2-byte signed delta pairs with 0x80 control escapes | Bernina home machines (via USB) & Melco commercial setups |
Janome (.JEF) | Janome Memory Craft, Elna | Yes (Janome 78-thread catalog codes) | Fixed offset table + thread index array + signed delta coordinates | Janome flat-bed and free-arm embroidery machines |
Step-by-Step: How to Convert DST to PES and Fix Thread Colors
You do not need expensive desktop digitizing software to convert embroidery formats or fix missing .DST colors. Follow these four steps inside the Stitch Realm Embroidery Studio:
Step 1: Load Your Embroidery File Into the Browser Studio
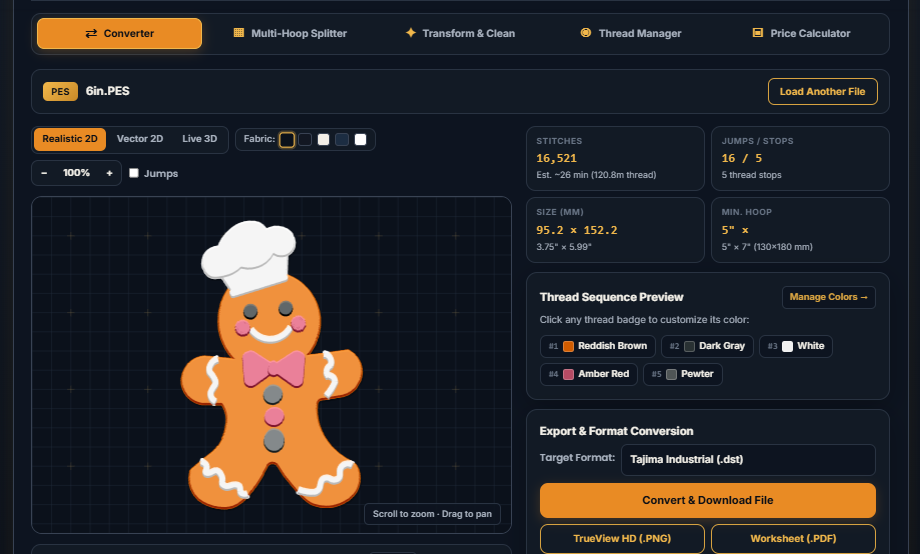
Open the Stitch Realm Converter Studio and drag your .DST, .PES, .EXP, or .JEF file into the upload box. Because the studio runs 100% client-side in your browser, your proprietary design is never uploaded to a remote cloud server.
Step 2: Inspect Stitch Density in Realistic 2D & Live 3D WebGL
Use the top viewport bar to toggle between Realistic 2D, Vector 2D, and Live 3D. You can rotate the 3D stitch model, test how thread colors contrast against dark velvet, denim, or natural linen fabric backgrounds, and run the Play Stitch-Out Simulator to watch the needle path stop by stop.
Step 3: Assign Official Brother PEC Thread Colors
Switch to the Thread Manager (◉) tab at the top of the studio—or click any color badge under Thread Sequence Preview:
- Click the color stop you want to change.
- Select the exact match from the 64-Color Brother PEC Thread Catalog (or pick a custom RGB shade).
- If your file has redundant adjacent color stops of the same thread, click Merge Adjacent Identical Color Stops to eliminate unnecessary machine trims.
Step 4: Export Your Converted File + Operator Production Sheet
Return to the Converter (⇄) tab, choose your target format (.PES, .DST, .EXP, or .JEF), and click Convert & Download File.
Pro Tip for Commercial Digitizers: If you sell embroidery files on Etsy or your own shop, click Download All Formats Bundle (.ZIP). In one click, the studio generates .PES, .DST, .EXP, .JEF, a high-resolution TrueView HD (.PNG) mockup, and a print-ready Operator Production Worksheet (.PDF) showing every color stop, stitch count, and thread meter measurement.
Frequently Asked Questions About Format Conversion
Does converting DST to PES change the stitch density or resize the design?
No. A true binary format conversion translates the exact 0.1 mm needle coordinates from the source file into the target format without recalculating satin columns or tatami fills.
Why won’t my Brother machine read a converted PES file on my USB stick?
Even when a file is in .PES format, a Brother machine will hide or reject the file if the design’s physical width or height exceeds your machine’s maximum hoop boundary (for example, loading a 130×180 mm design on a 100×100 mm 4×4″ machine). Use the Multi-Hoop Splitter (▦) or Transform & Clean (✦) tab in the Stitch Realm Studio to check your hoop limits before exporting.